Customized Lunch Box
Father's Day has come around again this year and for me, it's one of the hardest holidays to buy for! What do you get the Dad who has it all?! Personalized crafted items - which I've taken my own time to make - is the direction I've taken this year.
My dad has recently taken to bringing snacks to work in a plastic bag. While I could go just buy him a lunch box, that's nothing special, I needed to personalize it!
I did purchase a neoprene lunch box online to personalize. This is how I used HTV Vinyl to personalize the lunch box.
Supplies:
- lunchbox
- HTV vinyl (Iron on vinyl)
- Iron or Mini Iron or heat press
- Heat Transfer Cover sheet (you can use an old undershirt or cooking parchment paper)
Step 1: Bring up the Cricut Design studio. Sign in and start a new Project.

Step 2: Choose a template to design on.
We use templates so we can make sure the design is proportionate to our item/lunchbox.

Step 3: Measure your lunchbox and set your template to the right size.


Step 4: Add your design.
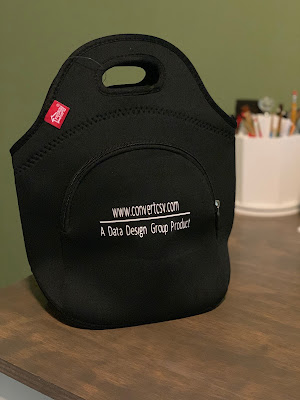
For my own project, my dad has a Data Conversion site called www.convertcsv.com. This is his passion and so this is what I'm putting on his lunchbox.

HOT TIP: For free fonts for personal use, check out www.Dafont.com. There are tons of fonts that you can download and install.
Step 5: Once you've designed all your pieces, make sure you select all the pieces and click "Attach".
This will make sure your design lays out correctly when it comes to cutting it.

Step 6: Select "Make It" in the top right hand corner of the page. You will need to select "Mirror" for Iron on Vinyl.

Step 7: Place your HTV vinyl shiny side down on your mat. Set your Cricut to the Iron-On Vinyl setting and cut your design!

Step 8: Weed your design.
There are a few different tools that make weeding easier. There is a crafting tool kit that you can get and the weeder tool is key.

Step 9: Position your design on your Lunchbox.
Because we mirrored during the cut, your design should lay out correctly on your lunchbox.


My dad has recently taken to bringing snacks to work in a plastic bag. While I could go just buy him a lunch box, that's nothing special, I needed to personalize it!
I did purchase a neoprene lunch box online to personalize. This is how I used HTV Vinyl to personalize the lunch box.

Supplies:
- lunchbox
- HTV vinyl (Iron on vinyl)
- Iron or Mini Iron or heat press
- Heat Transfer Cover sheet (you can use an old undershirt or cooking parchment paper)
Step 1: Bring up the Cricut Design studio. Sign in and start a new Project.

Step 2: Choose a template to design on.
We use templates so we can make sure the design is proportionate to our item/lunchbox.

Step 3: Measure your lunchbox and set your template to the right size.


Step 4: Add your design.
For my own project, my dad has a Data Conversion site called www.convertcsv.com. This is his passion and so this is what I'm putting on his lunchbox.

HOT TIP: For free fonts for personal use, check out www.Dafont.com. There are tons of fonts that you can download and install.
Step 5: Once you've designed all your pieces, make sure you select all the pieces and click "Attach".
This will make sure your design lays out correctly when it comes to cutting it.

Step 6: Select "Make It" in the top right hand corner of the page. You will need to select "Mirror" for Iron on Vinyl.

Step 7: Place your HTV vinyl shiny side down on your mat. Set your Cricut to the Iron-On Vinyl setting and cut your design!

Step 8: Weed your design.
There are a few different tools that make weeding easier. There is a crafting tool kit that you can get and the weeder tool is key.

Step 9: Position your design on your Lunchbox.
Because we mirrored during the cut, your design should lay out correctly on your lunchbox.

Step 10: Cover your design with your Heat Transfer Cover sheet and iron on your Design.
Here's the part you'll need to do some recon on. Depending on the brand of HTV Vinyl you use AND the material of your lunchbox, you may need to adjust the heat temperature and the duration of the ironing time.
I use SisterEasy Weed HTV Vinyl - setting my iron on Linen setting for 15 seconds.
I have used a Mini Iron with Neoprene in the past on high using medium pressure for 15-20 seconds.
Check out time and temperatures using a Heat Press here.

Step 10: Peel the plastic and enjoy your personalized lunchbox!

This comment has been removed by the author.
ReplyDelete