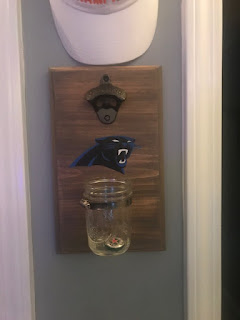
DIY Wall Bottle Openers
For part of the Groomsman gifts for our wedding, we chose to make personalized wall bottle openers for each of the groomsman.
Materials:
1x12" @ 4'
Wall Mount Bottle Openers (we used these spraypainted black)
Adjusted Hose clamps (we used these)
Mason Jars
Keyhole hanger with screws (we used these)
Wood stain (DIYers choice)
Tools
Router
Sander
Saw (we used a miter saw)
Drill
OPTIONAL: logo/art using cricut
Step 1:
Drill the wood so you have a 12"x6" piece of wood. Or your desired width.
Step 2:
Route the edge of your wood. We chose a round bit for our bottle openers.
Step 3:
Sand your bottle openers. We started with a 60 grit, moved to a 150 grit, and finished with a 220 grit. We also used a hand sanding sponge along the router's edge to make sure everything was nice and smooth.
Step 4:
Stain the wood.
Step 5: (Optional)
Make a design for the center of your bottle openers. We chose to use the cricut to make college logos for these bottle openers, but this is designer's choice! If you chose to make a design, make sure you polyurethane over your project after!
Step 6:
Screw the Keyhole hanger onto the back of your project. We chose the keyhole hanger so ours would sit flush with the wall. You can chose a different backing if you wish.
Step 7:
Screw in the bottle opener to the wood.
Step 8:
Tighten the hose clamps so the mason jars fit within the clamp. Then screw them onto the wood. Make sure you place them high enough that the mason jars do not hang below the base wood of the bottle opener.
Step 9:
Place the mason jar into your hose clamp and hang onto the wall!
I've made a few of these for other gifts since they were such a hit! I think I even like a lighter stain better.


Comments
Post a Comment